in-sufficientdata (![[personal profile]](https://www.dreamwidth.org/img/silk/identity/user.png) in_sufficientdata) wrote in
in_sufficientdata) wrote in ![[community profile]](https://www.dreamwidth.org/img/silk/identity/community.png) rp_help2025-04-04 10:44 am
rp_help2025-04-04 10:44 am
Entry tags:
tutorial: Site beta composer
As mentioned in the Dreamwidth site tutorial, I recommend using the beta composer. Here's a tutorial for all the features in the composer so you can take advantage of all its features.
Choosing a language
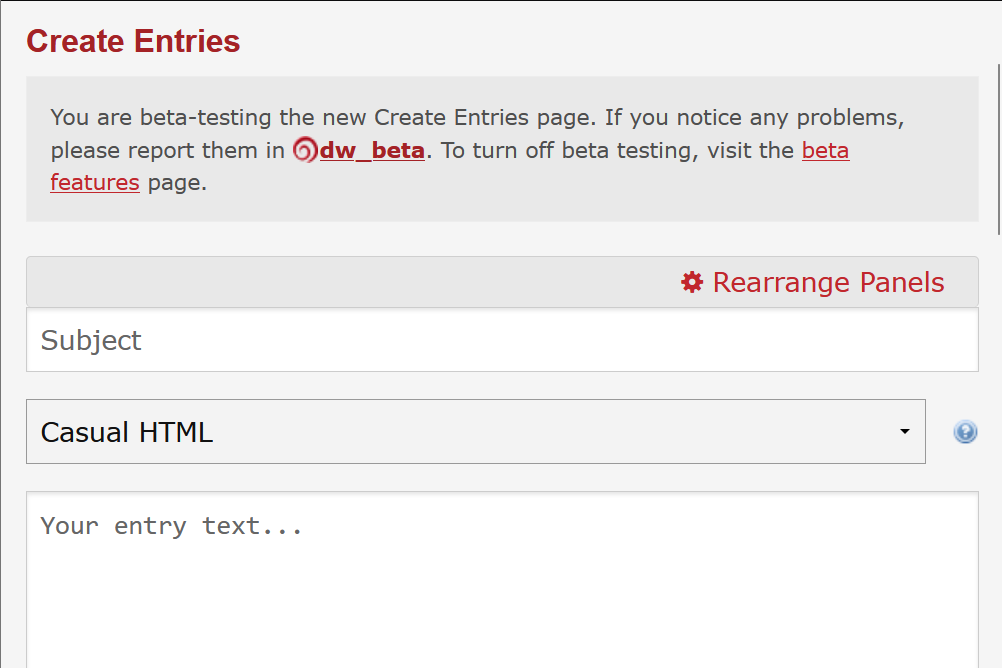
Most people who RP on DW use the casual HTML option (which is chosen by default), but you can also use Markdown.

You may be familiar with Markdown code from using sites that use it such as Reddit. A tutorial on each language will be included toward the bottom.
Other options for use are the Raw HTML option or the Rich Text Editor. Raw HTML will include the need to do such things as including <br /> tags for every line break, so it's a less attractive option than the Casual HTML option, but it's there if you want to use it. The Rich Text Editor is a WYSIWYG editor, but may include less flexibility in editing than just using Casual HTML.
Adding needed panels
Above the place where you choose which language you will use, at the upper right, is a link with a gear icon labeled 'Rearrange Panels'.

I would choose the configuration shown here. You will need the Comment Settings if you ever intend to screen comments on an entry (e.g. for an HMD) and you will need Display Date if you ever intend to backdate an entry (which is useful if you want the entries on the journal to display in a specific order).
Cut tags
There is a Dreamwidth-specific tag that will hide contents of a post after the tag on the front page of a journal or comm. To use it, you simply insert the tag <cut> anywhere you would like the text to cut off. This works in both the HTML composer and the Markdown composer.
You can also include text that will make the cut include a byline. To use this you type <cut text="whatever you want it to say"> .
HTML styling
There are a lot of add-ons you can use to pretty up text colors, fonts, links, pictures, and so on.
[ Note that you cannot copy and paste tags with code from composers such as Gdocs, since Gdocs uses curly quotes by default. All quotation marks in code need to be straight quotation marks for them to work in the code on Dreamwidth. ]
The tags I covered in the Dreamwidth tutorial are as follows:
Links: <a href="https://dreamwidth.org/">I like to RP on Dreamwidth</a>
Smalltext: <small>[ Here's some bracket text for a tag. ]</small>
Changing fonts: <font face=monospace>Here's a texting tag.</font>
Bold: <b>bold text</b>
Italics: <i>italic text</i>
Underline: <u>underlined text</u>
You can do lots of things to these tags by adding a 'style' attribute. For just about anything you want to do, you can google for the css for an effect and add the effect as a style attribute to the tag. For example, if I want a link that's not underlined, I can do this:
<a href="https://dreamwidth.org/" style="text-decoration:none">A link to Dreamwidth with no underline</a>
I can also use the style tag to change the link's color. To add another attribute to the style tag, separate it with a semicolon.
<a href="https://dreamwidth.org/" style="text-decoration:none;color:green">A green link to Dreamwidth with no underline</a>
Span tags
Styling text with multiple attributes is possible by using the span tag instead of multiple tags such as a font tag plus a bold tag, for example.
<span style="font-family:'Times New Roman';color:green;text-decoration:double underline;">I did a lot of things to this line of text.</span>
[ Note that if the name of the font you want to use has a name with spaces in it, you must use single quotes to set the name off. ]
Divs
See some fancy coding that includes boxes or panels? That was probably made with divs.
This is a box with some text in it, a silver border, and rounded corners.
This is the code I used to make this div:
<center><div style="width:400px;text-align:left;border:2px solid #999;border-radius:10px;color:#999;background:#000;padding:3px">This is a box with some text in it, a silver border, and rounded corners.</div></center>
[ Note that if you learn HTML for use elsewhere, the <center> tag is deprecated. It's just still usable for doing things here on DW. ]
Other useful tags
Headings
The tags for various size headings begin with <h1> </h1> and go down to <h5> </h5> .
Heading 1 example
Heading 2 example
Heading 3 example
Heading 4 example
Heading 5 example
Strikethrough
The tag for strikethrough text is <s> </s> .
Blockquotes
This is text in a blockquote.
The coding for this looks like this: <blockquote>This is text in a blockquote.lt;/blockquote>
[ Note that < and > characters show up in a blockquote instead of being part of an HTML tag. You can use this to show people your code, if you wish. ]
Offset text
The tag for this is <dd> </dd> .
Dividing line
A divider looks like this:
The default styling is pretty subtle (if you don't see anything, it's a very light silver) so I usually style it to make it darker if I'm using it in a post.
The coding for the one I just posted looks like this:
<center><hr style="border:solid #222 2px;width:500px"></center>
If you don't style it to be a certain width, it'll go all the way across.
Lists
- bullet point list item
- bullet point list item
- bullet point list item
The code for a bullet point list (an unordered list, hence the tag 'ul') looks like this:
<ul><li>bullet point list item
<li>bullet point list item
<li>bullet point list item</ul>
A numbered list (an ordered list) looks the same but has the tags <ol> </ol> .
[ Note that for many of these tags, you need to avoid having a line break after the coding to have the spacing look right when you submit the post. Examples include the headings, the offset paragraphs, and the lists. ]
Using the Markdown option in the composer
HTML tags for cuts, font styling, and the like still work in the Markdown editor. The other coding you need to know for Markdown are as follows:
**bold text**
*italic text*
***bold & italic text***
__underlined text__
Using hyphens at the start of a line will cause the text to autoformat as an unordered list. Using numbers will autoformat as an ordered list.
Links in Markdown are formatted like this:
[Link text](https://dreamwidth.org/)
Note that there is no space in the code there.
If you want to use a hyphen or asterisk without the composer autoformatting it, put a backslash (\) in front of it.
[ Note that in the Markdown editor you need a full line break between paragraphs. You can use the HTML tag <br /> if you want a single line break. ]
Final note about the beta composer
The beta composer will not allow you to close tags out of order. For example, the following code will not allow you to post:
<b><i>I'm trying to post some bold, italic text.</b></i>
All you would have to do in this case to get it to submit is put the </i> tag before the </b> tag:
<b><i>This version works.</i></b>